Carrot Seed Saving
Carrot seed saving
Daucus carota sativus
Here I’ll share my story on how I learned to successfully save carrot seeds. It truly was by listening to the plants (as well as having a pretty good background in gardening and seed saving in general) that I came about this technique. It wasn’t something I learned in a book or read online, and I think that’s part of what made it so special.

Dragon and Scarlet Nantes carrots grown from saved seed.
Gosh, I can’t even remember what year it was, probably about 2016, we were in Skagway Alaska (zone 4-5), and I had harvested the remainder of our carrots from the community garden bed we grew them in. The city water to the site had already been turned off and for some reason I didn’t rinse them before putting in bags into the crisper portion of the fridge. Maybe I had some imperative errand that required my attention ~ who knows! Usually I wash them off, but I’m so glad that this time I didn’t! Autumn finished up and winter began and I still had some carrots left in ziplock bags. By about January I decided I’d juice them up, someday…
But time passed and one day I got to deep cleaning the refrigerator, sometime at the end of February, and those little, kinda dirty carrots were still in there (we had of course eaten most of them, what remained were pretty small ones). Those carrots didn’t look super appetizing to eat as they’d been in storage for many months by that point, but what caught my attention was that they were growing!! Small green tufts of green were sprouting from their tops and little white root hairs were developing off the tap root itself.

Here you can see the growing root hairs of carrots overwintered in the refrigerator.
Now, carrots are a biennial, which means that they need two seasons in order to produce seeds. The first year they grow their taproot, which we eat, and then if left to overwinter, the following year they put up their flower stalk and produce seeds. Other plants in this category include burdock, mullein, beets, Brussels sprouts, cabbage, cauliflower, celery, chard, collards, kale, kohlrabi, leek, onion, parsley, parsnip, rutabaga, salsify and turnip. Now some of these, like chard, collards and kale, leeks and parsley, I’ve witnessed seeding in their first year, sometimes successfully, when they are started early indoors and transplanted out and with a long growing season, most often in a greenhouse situation, but not always. In fact, my collard seeds, which I’ve been saving for years, are started indoors in March/April and grown outside, often produce viable seeds within one season.
When I saw that those carrots were growing a thought popped into my head, “you should try growing these for seed!” Huh? Never have done that, but I continued to ponder…if I planted them in a gallon pot, maybe 1-2 per, and put them under grow lights when I start my other seeds, maybe they’ll make it until May and I can plant them outdoors!?! Now, let me jump in here, normally, a carrot would just stay in the ground and overwinter, and then keep doing its thing next summer. However, in SE Alaska, the winters could be so cold and wet that the carrots usually rot. Even with enough mulch and snow cover. BUT, with gardening there’s always room for experimentation, so you could try leaving a few in and see what happens. My father-in-law in Pocatello Idaho left a few of his carrots in one year and lo and behold, the next summer he had baby carrots growing up in his lawn!
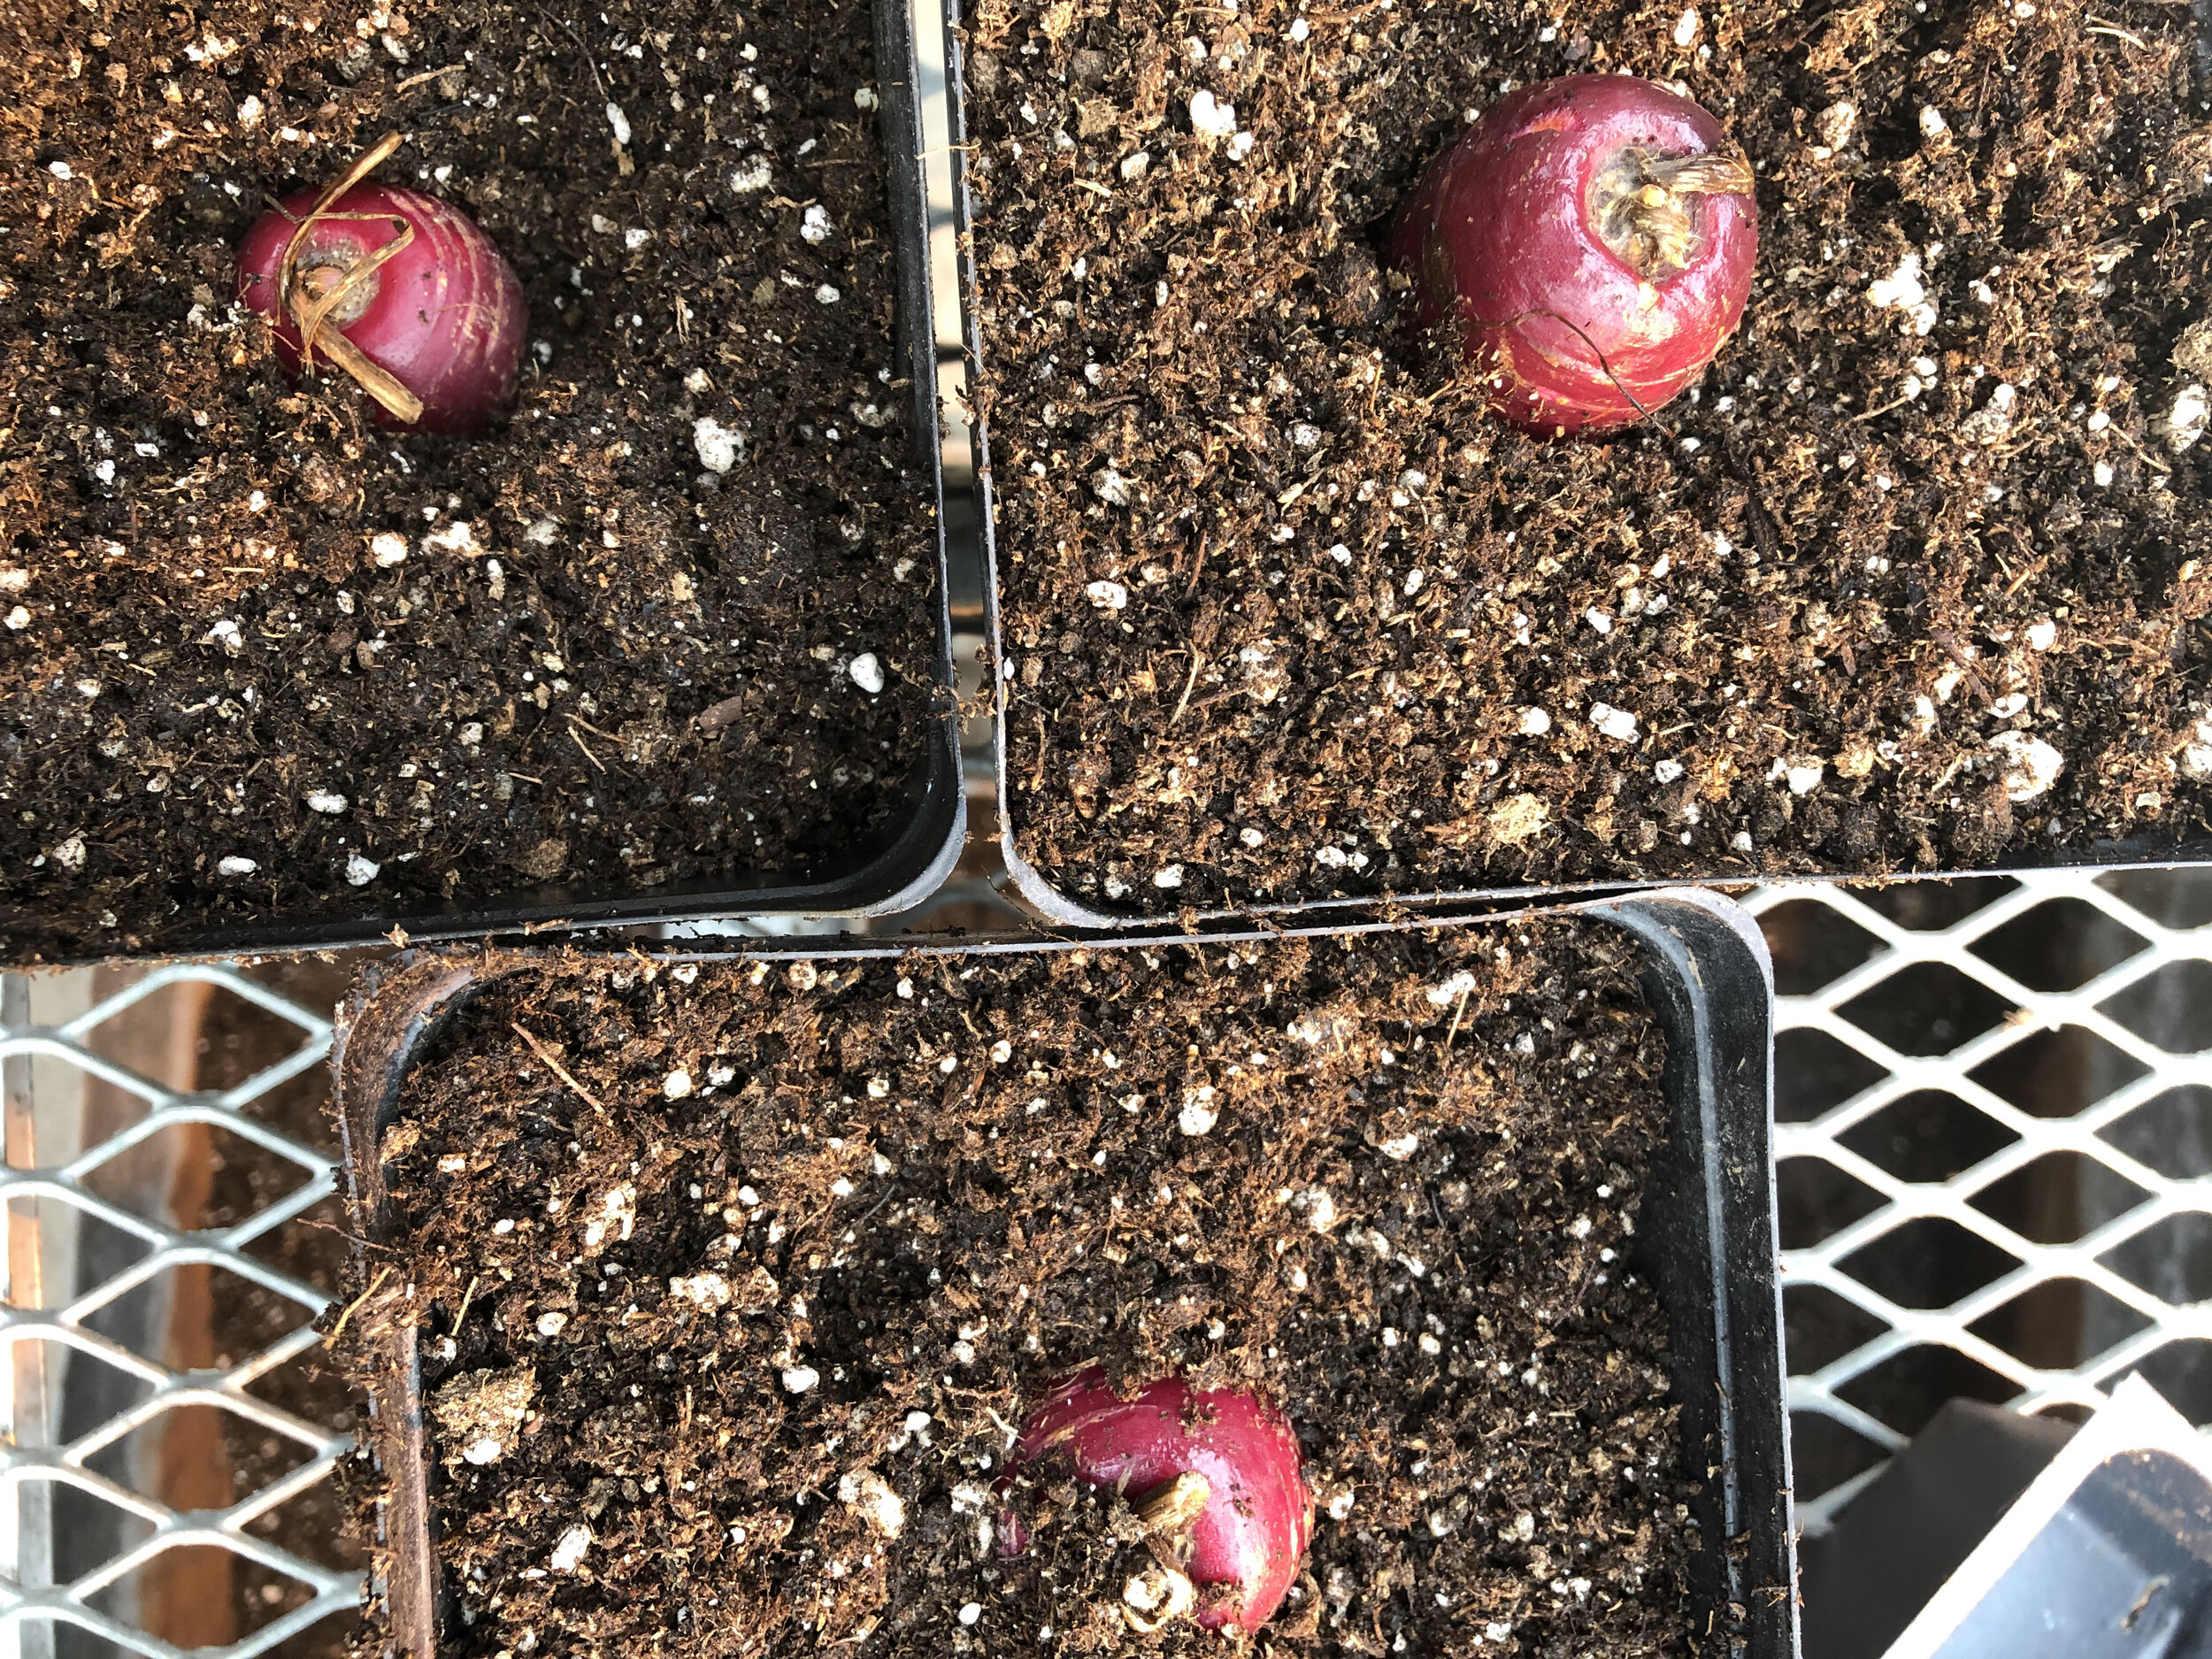
Potted up into gallon pots. I did add a bit more potting soil to these after the photo.
So, I planted those carrots (don’t use any mushy ones) up in some potting mix about mid-March when I usually start my indoor seeding. (See this musing for some tips on that: March 2021). And they started growing!! It was so neat to see it working! By May they were ready to be transplanted ~ very carefully, as tap rooted veggies don’t really enjoy being moved around much, it disturbs their growth ~ and you also want to be sure you harden them off. Hardening off is essentially getting a plant used to being outside, I always use this analogy when hardening off plants you’ve either grown or purchased from a vendor: imagine a new baby, tender skin that’s never been exposed to sunlight or wind. Would you expose that brand-new babe to the elements without a bit of protection from sunburn or cold? And would you keep that baby out there all day and night to deal with the temperature fluctuations? No. Same with a plant that’s been grown indoors. They need time to adapt to the blowing breeze and hot rays of the sun and the dampening drops of rain. I usually take a week or so (weather depending) to harden off my plants.
You can also transplant these carrots into larger pots and grow on that way too.

Growing carrots, flowering stalk, second year.
Back to the now growing outdoors, second year carrot plants. By mid-summer they were shooting up their flower stalks, topped with an umbel (like a flipped upside-down umbrella) full of little white flowers, and the pollinators love them! As these tall flower stalks develop, you may want to stake them, I have had to that to some in the past and it’s much better to take the time to stake rather than letting the seeds rest in the dirt because then saving them isn’t as easy, you want ‘clean’ seeds.
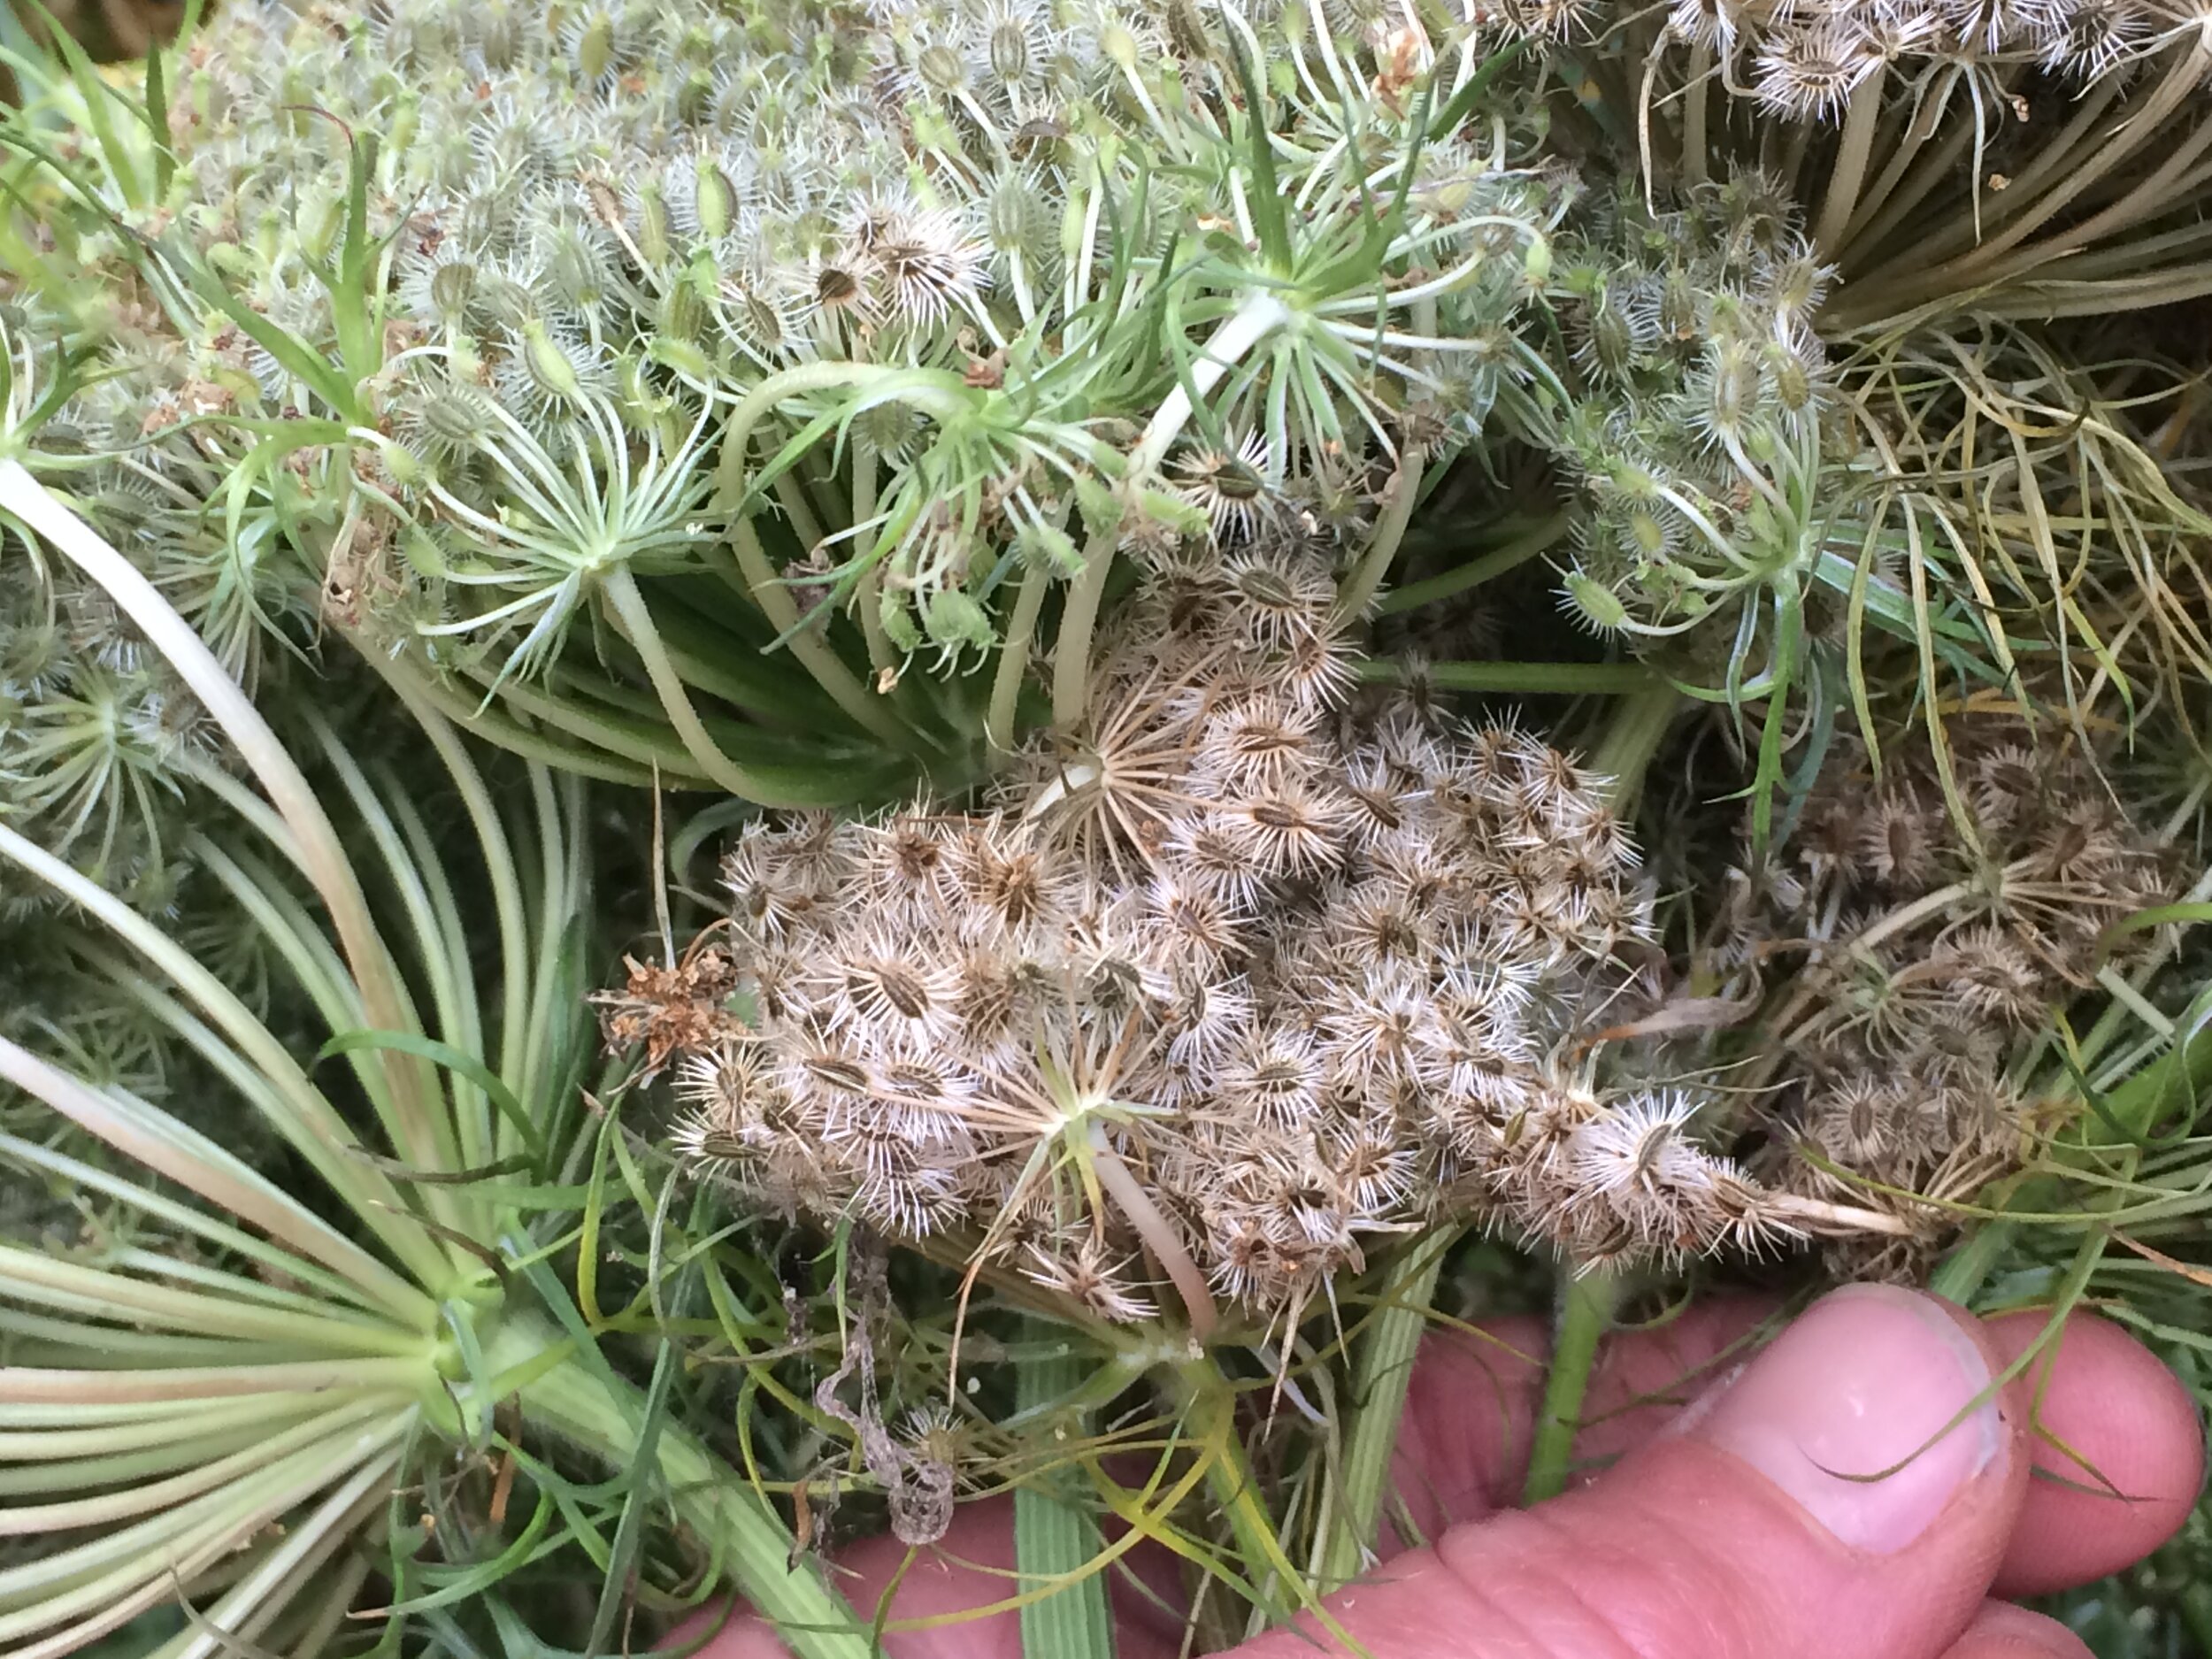
Here you can see the developing seeds, both green (not ready) and brown (ready).
Now after pollination, those little white flowers begin to develop into little green fuzzy seeds. Soon thereafter they will turn brown and when the majority of your seed head is nice and brown, that’s when you want to harvest your seeds. I take garden clippers or scissors and clip at the base of the umbel. Put the seed heads (there’s usually several) into a paper bag. It is important to do this process on a DRY day. If you harvest seeds when they’re damp, you’re just asking for mold. However, if like I did, you live in a coastal environment and the time frame for dry and brown seeds isn’t working, you could try harvesting your seeds on the least wet day, when arriving inside, immediately clip off those smaller umbels and lay out in a single layer on cardboard or a baking sheet. Now this part is tricky, you don’t want the seeds to get too warm else they’ll want to germinate; I’d try using an oven warmed up to 170 (about the lowest most home ovens allow you to go) and then turn off the oven, wait 5-10 minutes and leave the oven door cracked (use a baking sheet if you’re doing this and not air drying) and place seeds in oven stirring often. When they feel dry allow to cool completely and garble somewhat to remove any stems. You can then continue on with the following process.
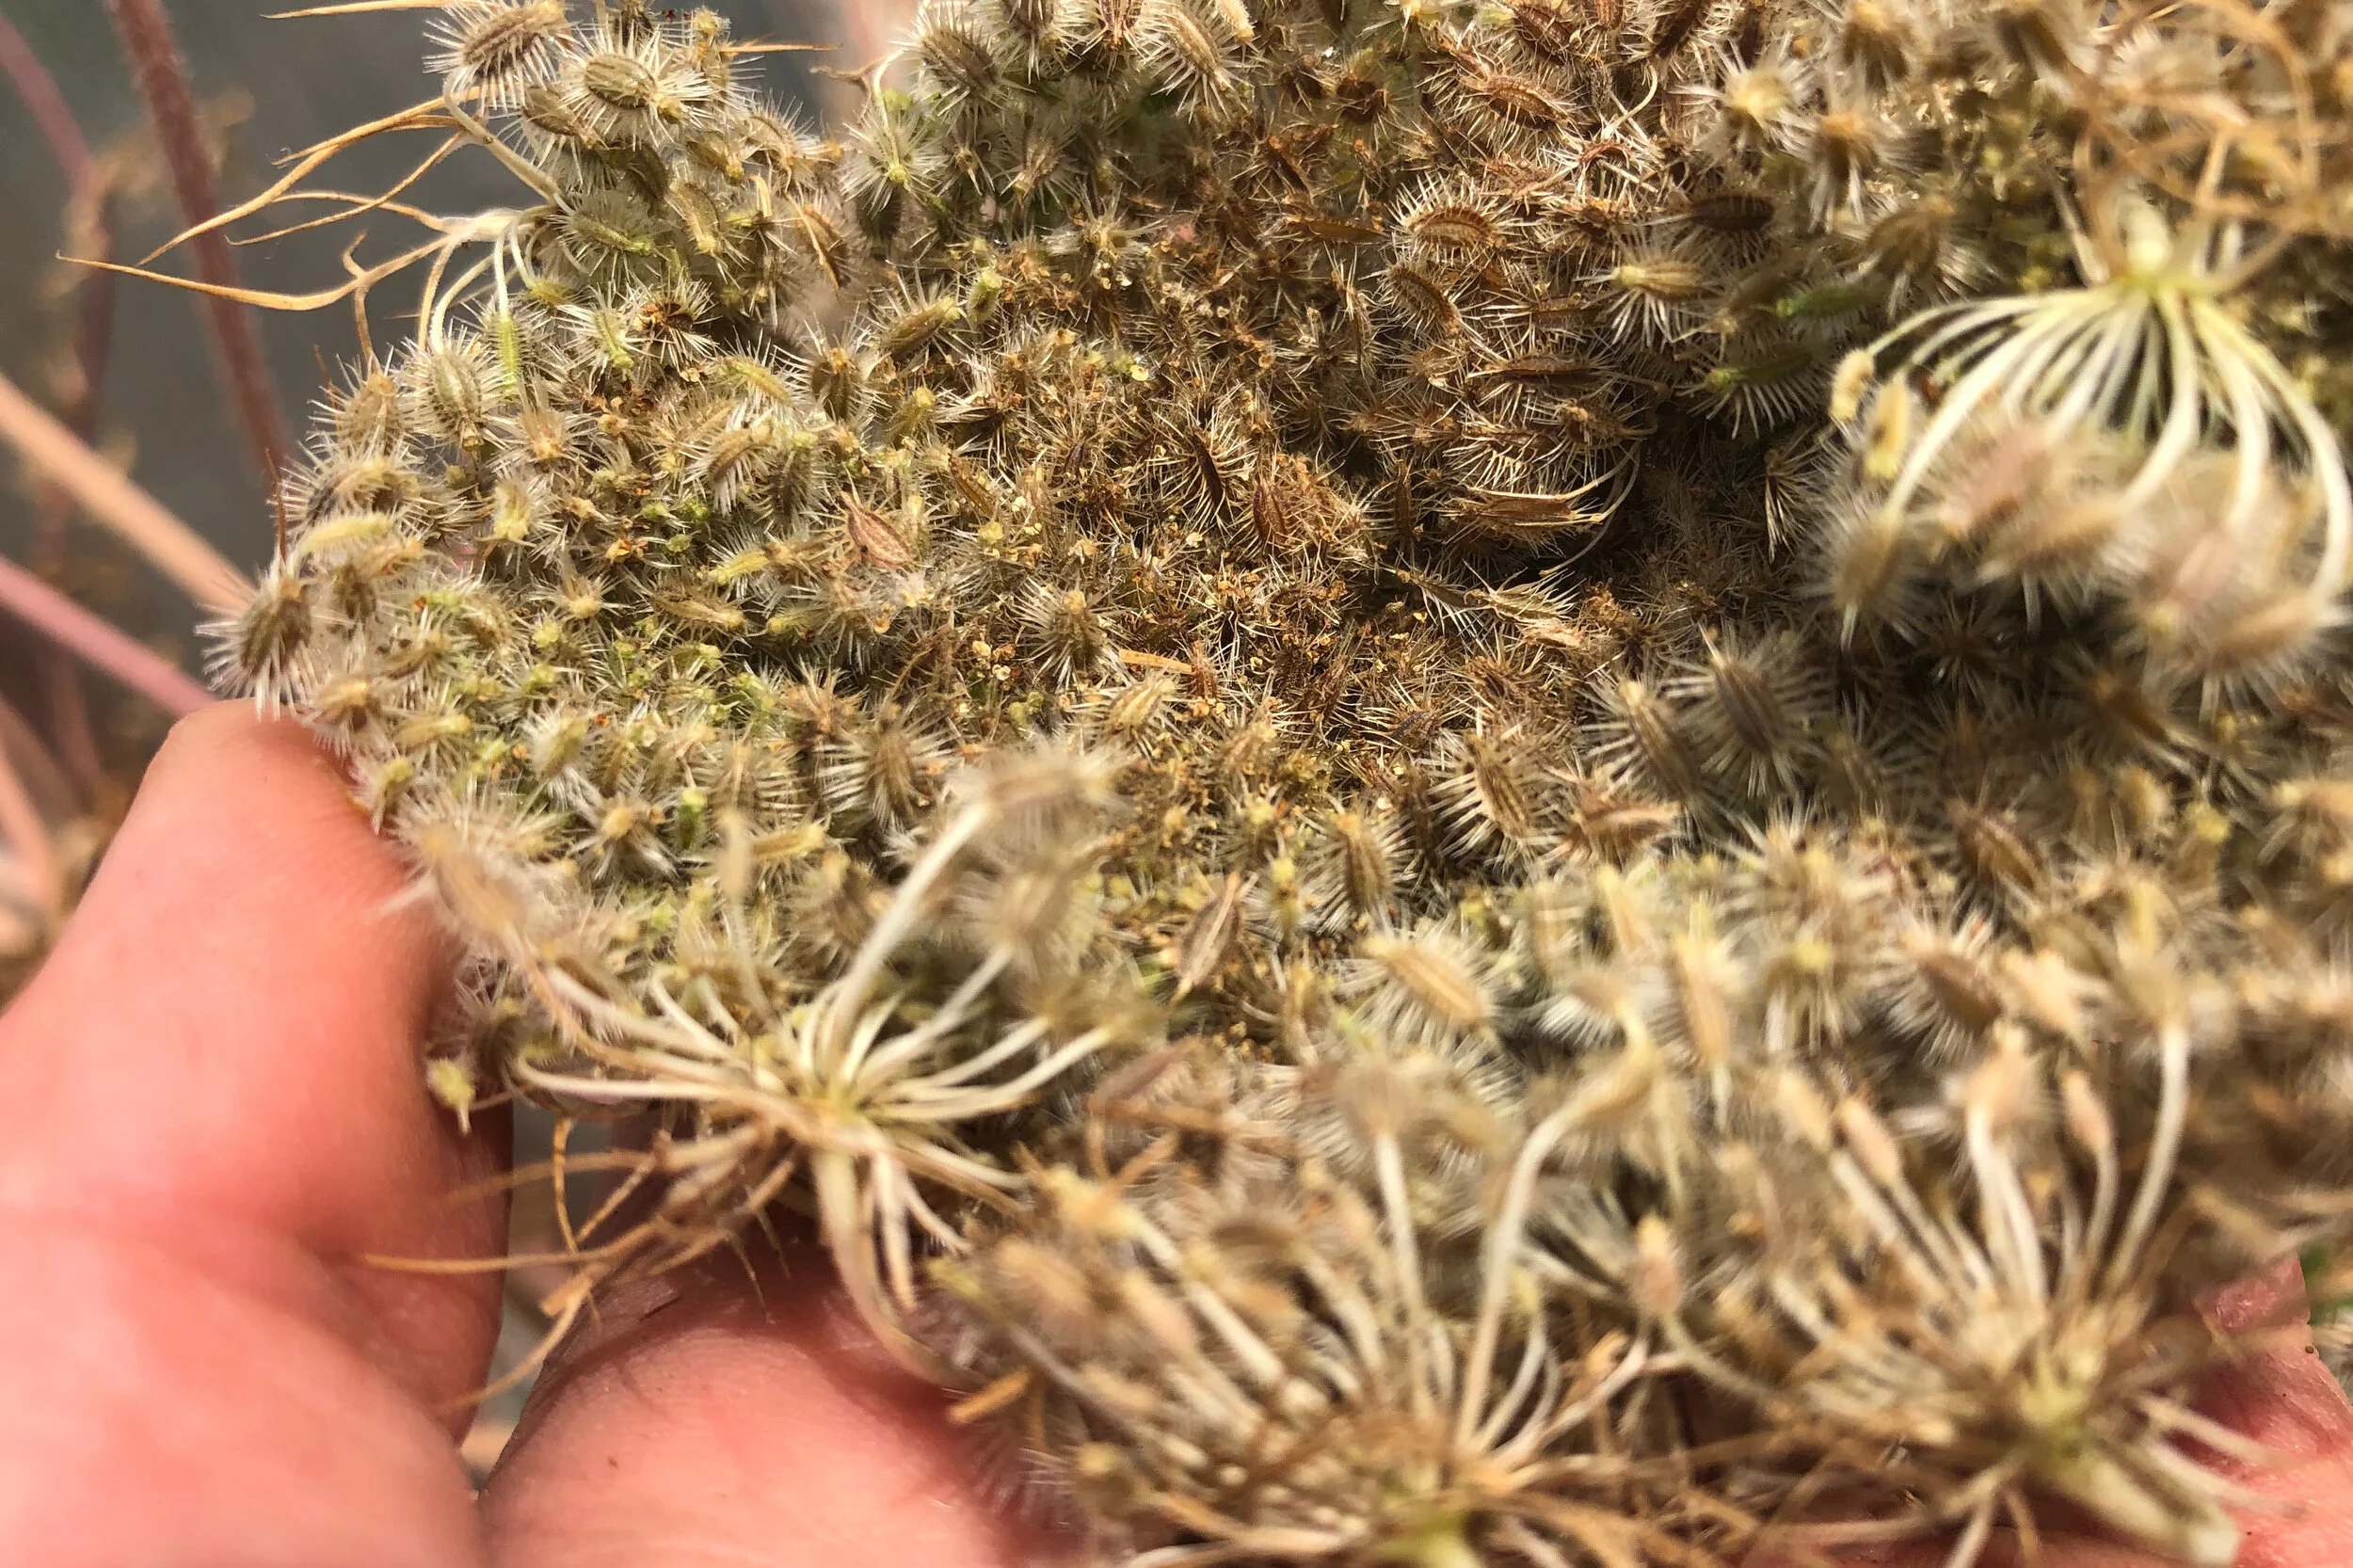
Carrot seeds ready to harvest!
If you were lucky and could harvest within a string of nice dry days, I would place those carrot seeds (minus any thick stalks) into paper bags and when you get inside, you can spread them out within those paper bags or use cardboard (the bottom of canning jar boxes works great; boxes with slats/holes can catch the seeds and you’ll lose part of your harvest). Again, you’ll want to trim them into smaller sections, don’t cut the seeds, just cut off or use your hands to get rid of those little stalks. Allow to dry and when dry place into jars or envelopes, being sure to label and date. Note: carrot seeds saved like this will still be fuzzy ~ you’ll notice that the ones you purchase are not. They go through a different process which I’m not entirely sure about.
Testing for germination: to see if your seeds are viable you can take 20 or so of those seeds, place into a paper towel, folded so there’s paper towel below and above the seeds. Dampen, not soak, the towel and place into a plastic bag leaving air to enter. Put on a little plate and keep in a warm place. Check daily to make sure seeds don’t dry out and within a week or two you should see little sprouts from those baby seeds! This is a wonderful process to explore with children and also a really fun experiment for us adults. This germination test can be done with most seeds (baring the need for stratification, which means fluctuations of cold and warmth, many perennials/native seeds would fall into this category).

Nothing like growing good food! Photo from Jewell Gardens ~ Skagway Alaska 2020.
What if you ate all your garden carrots already and still want to try this? Well, I imagine that you could also use a store-bought carrot and try it out. I’d choose an organic variety or some from the farmers market, as who knows what’s sprayed on the non-organic ones. I may actually do this next season as we’ve recently moved and I didn’t have my own garden to tend this past summer. And if you don’t have indoor growing lights, you could try starting carrots on a sunny window sill or near a sunny deck door about mid to end of April depending on your last frost date. I haven’t done that before, so I’m not sure if it would work as well.
Gardening is such an adventure in many ways and it’s always a treat to learn more about growing our own food which also incorporates saving our own seed! I hope this was informative for you and if you have any questions or comments, please feel free to leave them below. Happy gardening friends!

Homegrown carrots grown from saved seed!!